Publish your Mac at a real hostname.
Switch it off when you're done.
MyMicroTunnel gives a service running on your laptop a public HTTPS address —
updates.example.com, with a real certificate — by routing it through an AWS
load balancer and a WireGuard tunnel you control.
It runs entirely in your AWS account. Nothing is hosted for you, no traffic passes through anyone else's servers, and there is no account to sign up for. The menu bar switch is the only thing that decides whether the world can reach you.
Homebrew works too — brew install --cask mymicrotunnel from
this tap.
Universal build, signed and notarized. macOS 13 or later, Apple silicon or Intel. Free software under the GPL — the AWS bill is the only thing it costs.
client ──TLS──▶ NLB :443 ──▶ 10.100.0.2:3000
                              │
                      VPC route 10.100.0.0/24
                              ▼
                      gateway instance (Elastic IP)
                              │  WireGuard
                              ▼
                      your Mac 10.100.0.2 ──▶ your service :3000
What it is for
Some things are better served from a machine you can see. A staging build, an update feed, a demo, a service whose data should not leave the building. What those have in common is that they want a real hostname and a real certificate — and that they should not be reachable at three in the morning when nobody is watching.
A hostname, not a tunnel URL
Your own domain, your own ACM certificate, a Route53 record. Not a random subdomain that changes every restart.
Off by default
The tunnel is a switch, not a daemon that quietly holds the door open. Disconnect and the hostname stops answering.
No inbound port forward
Your Mac dials out. Nothing has to change on your router, and a new IP address from your ISP re-pins itself.
Your account, your bill
No middleman, no per-seat pricing, no rate limit. The only cost is the AWS resources, itemised below.
Several Macs, one hostname
Register more than one workstation and the load balancer spreads across them. Adding one does not interrupt the others.
Repairs itself
The gateway is an Auto Scaling group of one. A failed instance is replaced, keeps the same address and the same identity.
How it works
An AWS Network Load Balancer holds your certificate and terminates TLS. Behind it, a small gateway instance forwards to a private address that lives on your Mac, reached over WireGuard. The tunnel dials outward, so your network needs no changes.
Why not AWS Site-to-Site VPN
It needs a fixed public IP address, because AWS answers the IKE negotiation rather than starting it — and a laptop behind a residential NAT does not have one. AWS does support a certificate-based gateway with no address for exactly this case, but it requires an ACM Private CA at roughly USD 400/month, more than everything here combined. WireGuard inverts the direction and costs nothing extra.
Nothing to install first
The package carries its own WireGuard. macOS has no in-kernel implementation, so the
data plane is wireguard-go — MIT-licensed, built from a pinned and
checksummed release, shipped inside the installer and signed with the same identity.
Nothing to install beforehand: no AWS CLI, no Node, no Python, and no Homebrew
unless you would rather install it that way.
wg-quick? On macOS it is a bash script that needs
bash 4, which macOS has not shipped since 2007 for licensing reasons. Rather than drag
in a second installer, everything it did is implemented directly against wireguard-go's
documented UAPI socket. The config file written to /etc/wireguard/wg0.conf
is still wg-quick's format, so the standard tools can drive the same tunnel if you have
them.
The privileged part is small
Moving a tunnel needs root. Rather than a background daemon with broad powers, the app
gets one sudoers rule scoped to two exact command lines — raise this
interface, drop this interface — pointing at a root-owned helper in
/Library/PrivilegedHelperTools, a directory no package manager takes
ownership of. Your WireGuard private key is generated on your Mac and never leaves it.
Installing
About ten minutes, most of it AWS building the load balancer. The installer stops at the first thing that fails and names it, rather than reporting success on a half-built tunnel.
You will need
| A Mac | macOS 13 or later, Apple silicon or Intel |
| An administrator account | one password prompt, covering three files |
| An AWS account | the resources cost roughly USD 26/month |
| A domain in Route53 | in that account, as a public hosted zone |
| A service to publish | running on your Mac, on a known port |
10.100.0.2 — not 127.0.0.1. A
service bound to loopback is invisible to it, and the only symptom is a health check
that never passes. With Docker that means -p 3000:3000, not
-p 127.0.0.1:3000:3000.
-
Create AWS credentials for the installer
One click, in whichever AWS account you are signed into. It creates two IAM users: one that installs, and a narrower one the app runs as afterwards.
Both hold only the permissions this product uses — you can read every one of them in the template before you run it. It deliberately does not hand you a secret: stack outputs are stored by CloudFormation and readable afterwards, so you create the access key yourself from the link in the stack's outputs, and it is shown once.
If you already have a working AWS CLI profile that can deploy, skip this entirely.
-
Check your hosted zone
You need a public Route53 zone for the domain you will serve from. The installer finds it on its own; it only has to exist, and it is never created, changed or deleted by this.
The hostname needs three labels —
updates.example.com, notexample.com, which is the zone apex your website usually sits on. If the name already exists it is repointed rather than refused. -
Install it
With Homebrew:
brew tap IceSkatingCoach/mymicrotunnel
brew trust IceSkatingCoach/mymicrotunnel
brew install --cask mymicrotunnel
Homebrew 7 refuses a cask from a tap outside its own repositories until you say you trust it, which is the middle line and is asked once. The cask installs the same package as the button below, and you can read it before you run it.
Or download it:
Signed and notarized either way. It places the app, a command-line tool, the privileged helper and the tunnel, then opens the setup window by itself. The app updates itself from then on, so this is only ever needed once.
-
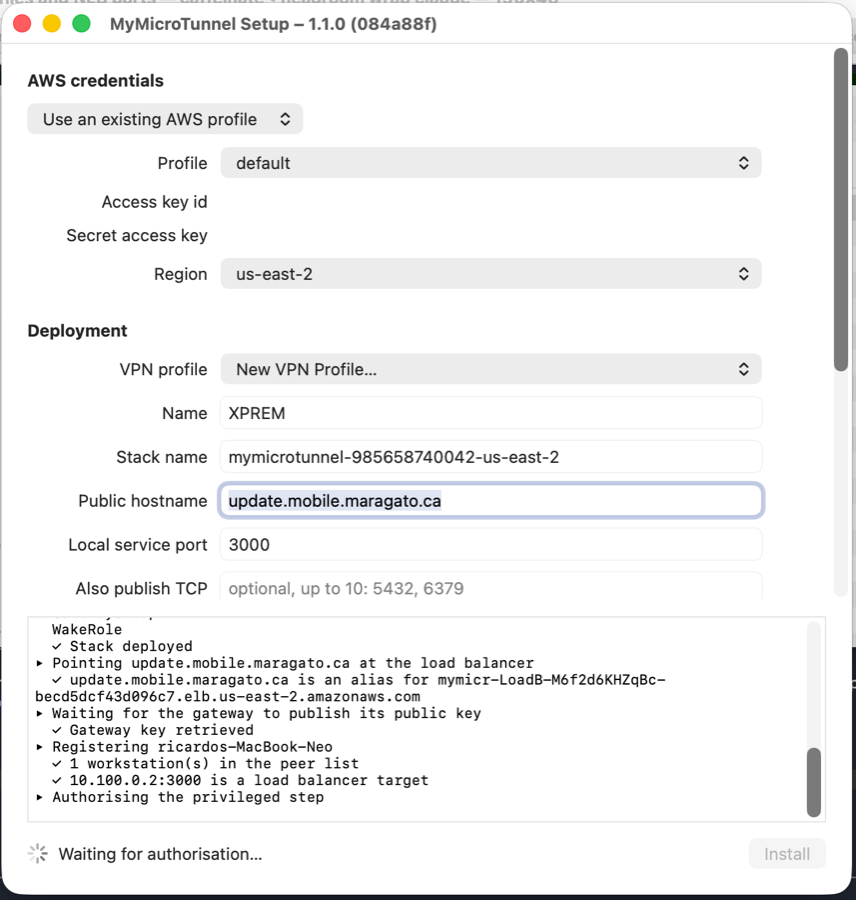
Fill in the setup window
It opens by itself, and on a first run it repeats these steps in front of you. Credentials, the hostname to serve and your service's port are the only things it cannot work out: the region is a list of what your account can reach, and the stack name fills itself in as
mymicrotunnel-<account-id>-<region>.Every published port is written
local:published—5432publishes 5432 under its own name,3000:8080publishes the service on your port 3000 as port 8080 on the hostname. The same applies to the HTTPS service itself, which is3000:443unless you say otherwise.Optional on the same screen: further TCP ports to publish on that hostname, the tunnel's own subnet, an idle timeout that switches the gateway off when nothing is using it, an address to email when the gateway fails, and whether this profile reconnects at login.
The credentials you type are used once — to mint the app's own key, which is kept in your login Keychain. The app does not keep yours.
-
Approve one password prompt
It covers the tunnel configuration, your private key, and the narrow sudoers rule. Nothing else asks again.
-
Watch it prove itself
The last stage checks every hop in the order traffic travels: tunnel up, gateway answers, load balancer healthy, hostname returns 200. A clean run means it is live right now.
Or from a terminal
mymicrotunnel install --domain updates.example.com --port 3000
mymicrotunnel status
mymicrotunnel peers
More than one deployment on one Mac
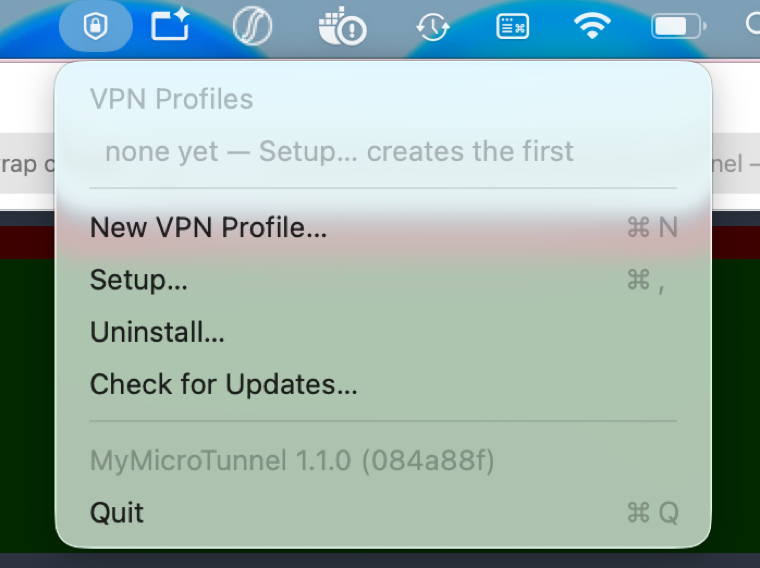
A VPN profile is one deployment as this Mac sees it: its own stack, tunnel subnet, WireGuard interface, published ports and switch in the menu. New VPN Profile… in the menu bar creates another, suggesting a name and a subnet that does not overlap the ones you already have.
mymicrotunnel install --vpn-profile lab --domain lab.example.com --vpn-cidr 10.110.0.0/24
mymicrotunnel profile list
mymicrotunnel uninstall --vpn-profile lab --delete-stack
Each profile decides for itself whether it comes back at login — a checkmark in the menu — and removing one offers to delete its AWS stack with it.
What it costs
MyMicroTunnel itself is free software and costs nothing. What you pay is AWS, billed to your own account, and you can see every resource it creates in the published CloudFormation template before you run it.
| Resource | Why it is there | USD / month |
|---|---|---|
| Network Load Balancer | Holds the certificate, terminates TLS, gives the hostname something stable to point at | ~16.00 |
t4g.micro gateway |
Terminates the WireGuard tunnel and forwards into the VPC | ~6.00 |
| Elastic IP | The fixed address your Mac dials, so a replacement gateway keeps the same endpoint | ~3.60 |
| Route53, ACM, SSM, CloudWatch | DNS record, certificate, peer registry, alarms | ~0.50 |
| Total | plus load balancer capacity units and data transfer | ~26 |
Alarms and their notification topic are only created if you give an address to notify.
Nothing is created that you did not ask for, and uninstall removes all of
it, including the parameters the gateway wrote for itself.
Licence
GPL-3.0-or-later MyMicroTunnel is free software. You may use it, read it, change it, and pass it on — and anyone you give a binary to has the same rights, including the right to the source.
What that means in practice
| Run it for anything | Commercial use included. There is no seat count, no licence key, and nothing phones home. |
| Read every line | Including the part that runs as root and the template that spends your money. |
| Change it | And ship your changes, under the same licence. |
| No warranty | As with all free software. It is tested, but it is yours to run. |
Third-party components are listed in full in the repository. wireguard-go is
MIT, Sparkle is MIT, the AWS SDK is Apache-2.0, and the golang.org/x
libraries are BSD — all compatible with GPLv3. Notably Apache-2.0 is compatible with
GPLv3 and not GPLv2, which is part of why version 3 was the only sensible choice.
Help make it better
This is a small project with a clear shape and a lot of obvious next steps. If any of these are interesting, they are genuinely open — not a wishlist someone is quietly already doing.
A Windows or Linux client
The AWS side is platform-neutral and the tunnel logic is ordinary Go. What is missing is the platform-specific interface handling and a front end.
A cheaper shape
The load balancer is most of the cost. A design that keeps the static address and the certificate without it would change the economics.
Onboarding for non-AWS people
Step one is still "create an IAM policy". That is a reasonable ask for an engineer and a wall for everyone else.
A diagnostics bundle
When it misbehaves on someone else's machine there is no single command that collects what a maintainer would need to see.
Integration tests against real AWS
CI checks everything except the part that actually deploys. A throwaway-account test would have caught more than one bug earlier.
Tell us it broke
Bug reports are contributions. What you did, what happened, and the output of
mymicrotunnel status is plenty to start from.
Getting in touch
Email mymicrotunnel@maragato.ca, or
open an issue or pull request on
GitHub.
make check is the gate — vet, formatting, tests, and CloudFormation
linting over both templates. If that passes, the change is in good shape.